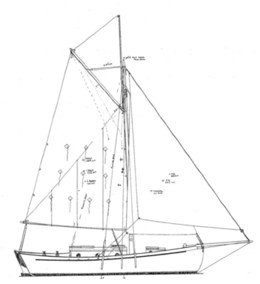
Early on in the build we had decided that one longer cabin was the only way for us to go, instead of the designed split cabin. We plan to use her for full time residency and constantly bending over to move forward, along with the head crack potential was not on our list of pleasant activities. We had also widened the cabin by about 6" per side and followed the shape of the deck, creating an equal size deck all the way to the fore deck.
This is a deviation from the traditional look of the these working cutters, but Mark Smaalders graciously did not seem disappointed and managed to design our revised cabin top to fit our needs. Lots of pondering went into how the lines would flow....with the cabin growing wider then narrower toward the bow the radius of each frames changes in order to keep the peak of the cabin parallel to designed water line. The height of the cabin sides follows the curve of the sheer. The front of the cabin has the rounded top that is reminiscent of the beautiful Concordias, and helps provide the needed head room. We wanted to keep the visual aspect of cabin walls as low as possible for aesthetics, as well as to decrease windage.
We sent Mark the exact measurements of the hole and the deck height from cabin sole. He came up with a design that he thought would work well, but due to the compound curves and slanting walls he thought it was not for the faint of heart to undertake. It needed someone with fairly advanced woodworking skills to make it all work...He sent us a whole packet of numbers and some artists renditions.....Go Richard.....

First order of business was to project "center" straight up...

Then a string line set out the horizontal line of the peak.

The cabin sides would be created with 3- 1/4" plywood panels laminated together in the curved shape of the cabin. These would be covered inside and outside with solid wood panels and left "bright", meaning varnished to show off the wood.
Richard decided to build a frame that would create the right curve and angle at each station for clamping the wood into the proper shape during the lamination process.
Richard decided to build a frame that would create the right curve and angle at each station for clamping the wood into the proper shape during the lamination process.

The frames were attached under the carlen, leaving a little slot for two layers of 1/4" marine plywood laminated together to slide down into...a third 1/4" layer would be applied on the outside, but sit on the deck, creating a strong staggered joint.

The frame was attached to the bow for stability.

The frame allows for the 1/2" per foot inward slant of the walls. This will keep the finished walls from looking like they are leaning out at the top.

But the frames have no relationship to the actual finished height of the walls.

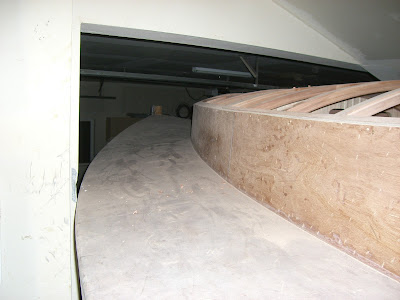
In this pic you can see the curve and slants as they progress from bow to stern. This was very hard to visualize until the building progressed.

One fall day, at the beginning of November, we had some visitors that seemed to be in love with our green lawn....they had apparently opened the gate of their pasture and came by for a several hour, very messy visit....
their mother finally arrived home and brought some bridles to lead them home.

While waiting for the lumber to build the cabin, Richard decided to tackle the shaping of the deadwood at the prop area.

Mark redesigned the shape to decrease the area between the deadwood
and the transom hung rudder,
This will decrease the potential for turbulence around the prop.
Khaya (a type of African Mahogany) boards were laminated in over fill in the area.
Khaya (a type of African Mahogany) boards were laminated in over fill in the area.

Here is the tool du jour....it is aggressive carbide teeth at all angles, on a grinder....
Jane was adamant that Richard wear heavy leather gloves and
Jane was adamant that Richard wear heavy leather gloves and
not do any grinding without adult supervision. This tool would only need a half second to do enough damage to lose a finger or hand.

Wood needed to be added to the sides to help center the keel.
Not pretty, but effective.


We drew the shape of the cut onto the rough deadwood,
then used the reciprocating saw to cut the rough shape.

That wood is thick and solid....epoxy is so much tougher than wood alone.

He managed to stay an inch or so from the drawn line.

Then the scary grinder started to hog off closer to the line.


Quick work to nebulize that wood.

The upper prop aperture starts to take shape.
The small hole in the center is the pilot hole for the prop shaft.


The small hole in the center is the pilot hole for the prop shaft.

Aggressive grit on a random orbital sander works well for shaping too.

It's starting to get dusty, and tougher to breathe.


 And the piece removed with the Sawz-all was a perfect fit when flipped over. Epoxy is king....


 Returning the sides, cut to height while in the shop. Note the scarf and the plastic staples.
 The corner joint was pondered.....the plywood needed to butt against it, and still leave room for the solid wood outer and inner layer.
 The front corner needed to account for the slant of the cabin sides in both directions.
 The corner post was screwed into the carlin to act as support for the final positioning.
 Starting to shape up. The front panel has not been cut to size.
 All three layers of ply are shown here.
 More coffee, please.....the start of another long day of boat building....
 All that geometry in school came in handy for trying to figure out the arc of each frame.
Remember rise and width? Maybe he should have paid more attention during class....
 Richard marked placement of every frame, and thought of how to shape the carlin.
He wanted each frame to be notched into the carlin.
 Here the carlin is rough fitted. It needs to start flush on the inner edge and high on the outside, since all the pieces will be faired to the shape of the cabin top.
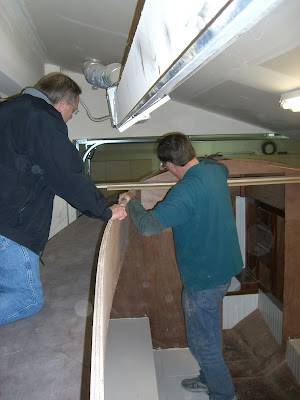
Randy came over to help with gluing up frames, and to "check the math"....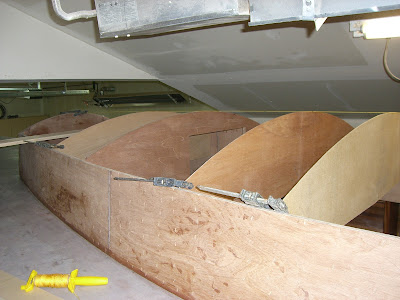
The arcs of the frames were mocked up from plywood.....seems the lines will work and the peak is lined up.
 The shape is looking good so far....
 Of course, we have the obligatory poses for the Christmas card.
 Had to do the clean-up thing....of boat, and ourselves....
 While the African mahogany frames were being clamped and laminated into their shapes,
Richard worked on the mahogany inner and outer wall.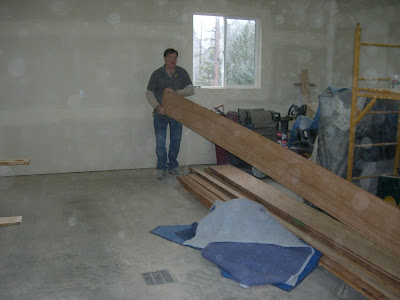
He wanted solid wood, since plywood would not fair very well with wear and tear and dings.
 He decided that 3/16 thick African mahogany would foot the bill.
Anything thicker had the potential to want to "walk back into the forest" and the plywood underneath may not have had the strength to keep it from checking or twisting. Specialty Forest Products picked and sent some nice wide boards that were booked matched.....of course then we had to ponder which edges to put together and
which boards to use: in/out, port/starboard.
 He straight lined the edges and matched them up like this...book matching is when the board is butterflied out so that the grain is mirrored on each side.
 Thickened epoxy was used to wet out both parts and the fitted solid wood was clamped to the existing plywood cabin side interior.


Here, laying on the deck is the new carlen, laminated to the shape of the cabin top.
Note that the joint at deck and cabin wall has been filleted for strength and water tightness.
 On New Years we had a visit from Jane's parents (Idaho) and brother,
sister-in-law and nephew (North Carolina).
Of course, they received the class on how the boat was laid out,
and the entire process to where we are today.

Come on up and check her out....
 Brother is checking out the quarter berth.
Richard is showing off the beautiful notched joints of the frames that are fitted into the carlen,
but not secured in place yet.

Lots of show and tell...
 Including the Origo 6000 non-pressurized alcohol stove/oven.
"Feel the water flow"....
 Then Richard is back at it.... Epoxying the frames into the notched carlen, and making and mounting the half frames that create hatches, and the companionway.
 Each frame is about 9 layers of mahogany, laminated into shape,
then notch joined into other frames for strength.
Of course, epoxy drips into the beautiful interior was guarded against...
 Here is a closeup of the epoxy gooed corner. Note that there is a frame butted up against the back wall, the carlen still has not been faired to the cabin top shape, and the solid wood
is not applied to the outside.

Here is the framing at the fore hatch, over the head.
 View from the bow shows some of the shape.

The large opening on the left will be the butterfly hatch.
Looking forward and up at the fore hatch.


Here is a nice view of the cabin shape.

After the frames were in, the bulkhead door could be shaped and
V detailed tongue and groove strips could be fitted.
The mast partner is the solid piece that will have a hole cut in it to accept the keel stepped mast. It was formed by laminating layers of marine ply in the same curved shape as the frames adjoining it.
It will provide lateral stability to the mast about 6' up from its mounting spot on the cabin sole/keel.
 This shows the carlen faired to the shape of the frame tops.
 The corner cleaned up nicely.
I love the shape of the deck and cabin.
 Now the outside of the cabin top is book matched. It will be varnished and wasn't placed earlier, so that it wouldn't get beat up.
 Here is the low tech way to straight edge a long piece.
Straight line the wooden jig on the high tech tools and then use a skill saw.
Book matches must be perfect.

The frames are getting their first coats of varnish.


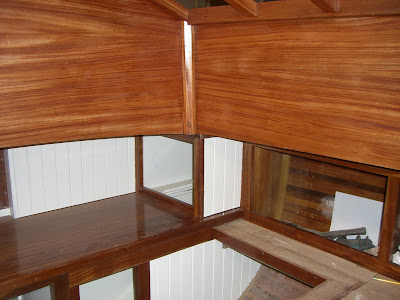
On the port side wall of the cabin top you can really begin to see the book matching.
All of the varnish work needs several coats prior to painting the white v-groove on the bulkhead. Any little slops of white will immediately soak into raw wood. After varnish, a little sanding can make touch up easy with a little light sanding.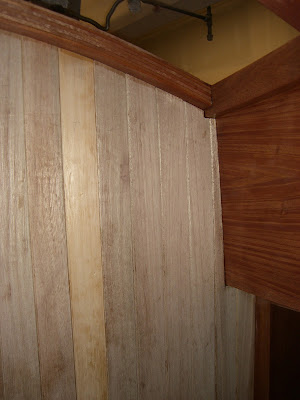
Here is the nicely fitted joint of the v-groove to the cabin side.
A pretty view of her shape.
A little bit of the book matching in the galley.
 Book matching in the front of the saloon, and the butterfly hatch.
Varnish in the head.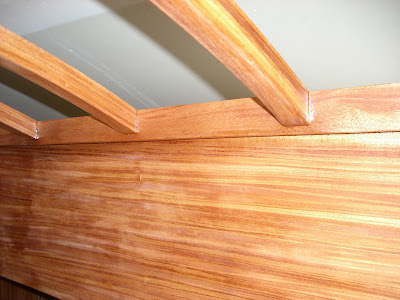
Sanding between each coat...
 The contrast of the white and the mahogany really starts to show up.
And the mast partner is varnished....we may decide to paint it later on
if it seems too prominent visually.
Richard is using the frames as monkey bars, seeing if there is any deflection.
Pretty stout, and the boards on top are not even nailed and
epoxied in place for added strength.

So happy with the shape....great job Mark!


A dirty guy.....he started out nice and clean.
Even the camera lens is getting filthy...

The prop shaft is centered in the thickest part for support.
The water is meant to flow across the hull and then the prop, with the
least amount of turbulence.
least amount of turbulence.

Oops...got thin enough to reveal a bronze nail used while laminating.
Pull and cut it out, and fill with a little epoxy. It will all be covered with
fiber glass and epoxy at some point.
Pull and cut it out, and fill with a little epoxy. It will all be covered with
fiber glass and epoxy at some point.

Red dust EVERYWHERE.......

The starboard side has not been shaped yet, and a couple more boards were added
for thickness around the prop shaft.

We place our little wooden prop in it's area. The rudder hangs from the long angled area above and the lower angled area. They actually are on the same plane. There was still a
small triangle piece missing above the cutout...


Back at the cabin, Richard put up a piece of cardboard to simulate the cabin sides. Of course, Jane could not resist pinning up some mock portlights....
what would traditional round look like?
what would traditional round look like?
Hard to visualize in that small room.

Plywood for the cabin sides would need pieced together for length.
They were scarfed as a unit.

Then they were epoxied end-to-end, with cinder blocks as weights. Note the use of wax paper. It prevents the squished out epoxy from sticking everything to the floor or the blocks.

Dry and ready for shaping. No straight edges around the compound curve.

The trimmed shaped sides are placed and stapled with the plastic staples during lamination.

Both inner pieces were slipped between the carlin and the frames. Plastic kept it from sticking, so that the plywood could be removed and worked on. Since it was laminated, it would retain it's shape.

Starting to figure out how the corners will work.....


Remember rise and width? Maybe he should have paid more attention during class....

He wanted each frame to be notched into the carlin.


Randy came over to help with gluing up frames, and to "check the math"....

The arcs of the frames were mocked up from plywood.....seems the lines will work and the peak is lined up.


Richard worked on the mahogany inner and outer wall.

He wanted solid wood, since plywood would not fair very well with wear and tear and dings.

Anything thicker had the potential to want to "walk back into the forest" and the plywood underneath may not have had the strength to keep it from checking or twisting. Specialty Forest Products picked and sent some nice wide boards that were booked matched.....of course then we had to ponder which edges to put together and
which boards to use: in/out, port/starboard.


A whole lot of clamps! The plywood ones were cut loose to slide over the top of the wall
and then shimmed to provide pressure the entire height of the wall. Of course,
the trusty C-clamps from Harbor Freight were pressed into service again.

Here, laying on the deck is the new carlen, laminated to the shape of the cabin top.
Note that the joint at deck and cabin wall has been filleted for strength and water tightness.

sister-in-law and nephew (North Carolina).
Of course, they received the class on how the boat was laid out,
and the entire process to where we are today.

Come on up and check her out....


Richard is showing off the beautiful notched joints of the frames that are fitted into the carlen,
but not secured in place yet.

Lots of show and tell...


"Feel the water flow"....


then notch joined into other frames for strength.

Of course, epoxy drips into the beautiful interior was guarded against...

is not applied to the outside.

Here is the framing at the fore hatch, over the head.


The large opening on the left will be the butterfly hatch.

Looking forward and up at the fore hatch.

The main saloon and butterfly hatch.

Here is a nice view of the cabin shape.

After the frames were in, the bulkhead door could be shaped and
V detailed tongue and groove strips could be fitted.

The mast partner is the solid piece that will have a hole cut in it to accept the keel stepped mast. It was formed by laminating layers of marine ply in the same curved shape as the frames adjoining it.
It will provide lateral stability to the mast about 6' up from its mounting spot on the cabin sole/keel.


I love the shape of the deck and cabin.


Straight line the wooden jig on the high tech tools and then use a skill saw.
Book matches must be perfect.

The frames are getting their first coats of varnish.

It makes the mahogany glow.

On the port side wall of the cabin top you can really begin to see the book matching.
All of the varnish work needs several coats prior to painting the white v-groove on the bulkhead. Any little slops of white will immediately soak into raw wood. After varnish, a little sanding can make touch up easy with a little light sanding.

Here is the nicely fitted joint of the v-groove to the cabin side.

A pretty view of her shape.

A little bit of the book matching in the galley.


Varnish in the head.

Sanding between each coat...


And the mast partner is varnished....we may decide to paint it later on
if it seems too prominent visually.

Richard is using the frames as monkey bars, seeing if there is any deflection.
Pretty stout, and the boards on top are not even nailed and
epoxied in place for added strength.

So happy with the shape....great job Mark!

It all fits together nicely.
Next step will be milling, painting, and applying the white v-groove strips,
then cold molding the cabin top with strips of Western Red Cedar.